
If you are in a situation that requires fast responses, like an event or a wedding, etc. then you will need the fast and automatic response of automatic TTL flash. TTL flash will give you excellent results when you’re not so concerned about your exact equipment settings as long as the results are there. But if you are in a controlled environment like a photo studio, then you would want the benefits of manual flash. In the studio it’s more important to know exactly all your equipment settings. In the studio you have time to pay attention to these settings.
Whether you use manual flash or TTL flash will not improve your photography. The function of a flashgun is to give out an amount of light – no more. It is up to the photographer how to decide the amount of light required and how to modify it.
The choice of whether you use manual or TTL flash will be mostly a question of how convenient it is for you to use. Some people want to have the camera system decide the proper amount of light while others prefer to have complete control of the amount of light themselves.
Writing an article like this is always an interesting experience – mostly because I may say something that will enflame people’s sensibilities. I find myself trying to justify why I do what I do.
I note down all the logical reasons for preferring X over Y. Then I try to write them all down to explain it to you. When in actual fact, my reasons for preferring X instead of Y will be different to yours. Also, I feel that, as well as trying to come up with reasons to convince you to adopt manual flash for your photography, I am trying to justify why I use manual flash.
But I don’t need to justify my reasons. They are personal to me – just like your reasons are personal to you. I don’t want to try and convince you of anything – I would rather show you how easy it is, and then let you learn to do it yourself. Or not. It’s your choice.
Instead I will assume you are already convinced that manual flash is the way to go, or you have a gut-feeling that it could be the right way for you – if you could get a better grip on it. In that case… welcome.
TTL Flash is good too
TTL flash has its place, of course. If you are taking photos at a birthday party or a wedding, etc., you will want to guarantee your photos are all good. TTL flash will help you achieve this. You can run around and shoot anything and the chances are your TTL flash will give you good lighting in each case.
However, let’s say you are working in a portrait studio. There’s no running around. You will be trying complicated lighting setups. You have all the time in the world to get the shot you’re looking for. The advantage of using TTL flash is now gone.
This does not mean that TTL flash is useless in the studio. Of course not. In every situation you are presented with, both TTL and Manual Flash can have their place.
I like Manual Flash because…
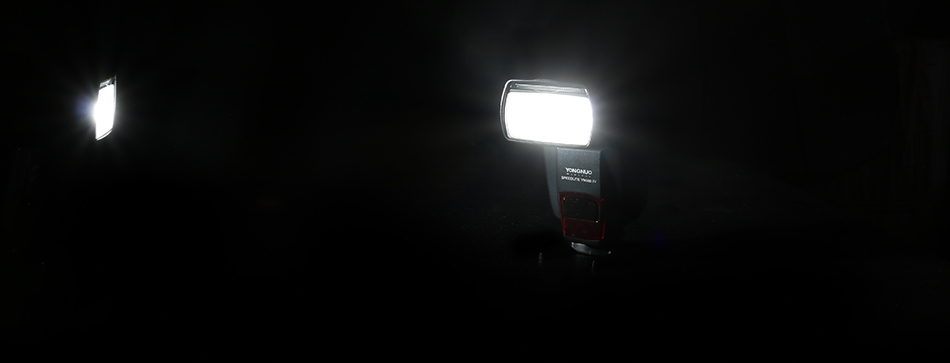
I was scanning aimlessly through Google one day when I saw a photograph that made me stop. I later went looking for it but couldn’t find it again, but the image stayed in my mind. It was similar to the one shown here. I found it so striking that I wanted to try it for myself.

So I broke out my only flashgun. I hadn’t used it for a few years by now. I felt I should blow the dust off it first, if it wasn’t in a protective case. But I did have to recharge the batteries and test-fire it a few times to confirm it still worked. Luckily the battery terminals were clean and showed no signs of corrosion. I replaced the batteries in the flash triggers and they still worked.
Even after a few years it needed only a few button presses to re-familiarise with the gear and everything was ready to go. I connected the system together and took a few test-shots. Good to go.
I was lucky enough to have a family friend on hand to model for me and I just started working on the shot. I set the flashgun on a light stand and started firing away. I knew the kind of lighting I had to emulate to get the result I was looking for, but I have to say it was not so easy to get it right. A few issues cropped up with the shot that took a while to resolve., but eventually I got a result I was happy with.

The point I am trying to make here is that I was using old (almost 10 years old) manual-only flash equipment. Also, I hadn’t touched this particular gear in years. But it was so simple to use that I re-acquainted myself with it in a few minutes.
And this is mostly why I like manual flash so much – the equipment is simple. I don’t use a flashgun every day – or even every week. There can be long spells between when I will use it. But when I need to use it, I can get immediately back into it with no problem. I can forget about what button I have to press, or how to adjust the flashguns and triggers. I can concentrate on taking the photograph.
I find that the more complex a piece of gear is, the smaller percentage of its capabilities I use. Take my phone, for example. Of all the things it can do (according to the installed apps) I use it for texts and Facebook. Oh yes, and the odd phone call too. It’s the same with my camera – I use it in Auto to get exposure settings and then almost always switch to Manual to take the photo. I have never used the Landscape mode, or the Sports mode, or even the Portrait mode etc. I don’t use its video capabilities. I find that when I am using an All-Singing-All-Dancing piece of gear, I will favour a few areas of it and ignore the rest. It would be the same for an All-Singing-All-Dancing flashgun. Also, if it is a complex piece of kit, I will forget how to work its menu system. I use 100% of the capabilities of my manual flashgun. As it is simple to use with no menus etc., then it’s easy to pick up and start using again.
This simplicity is very important when dealing with models too. Picture yourself as the model, and watching the photographer trying to press a number of buttons to find a menu item. He checks the manual. Muttering under his breath, maybe? Now picture the same photographer – he takes a shot, adjusts the flash, takes another shot, etc. Which one inspires confidence?
Setting the flashgun up
One thing that I would recommend, and have always done, is to have a full set of fully-charged batteries for each piece of gear that needs them. If you have dead batteries, all you can do is pack everything up and go home.
- I’ve always left the triggers all on the same channel but a quick glance at the DIP switches when installing the batteries confirms this to be so.
- I set one flash trigger to receive and the other to transmit – that’s kind of obvious.
- Press the transmit button and the receiver lights to show it has received the signal.
- Fit the receiver on to the flash and the transmitter on to the camera. (If I get this wrong, I can just switch their function – each trigger can be the transmitter or the receiver).
- Test-fire the flash – ok, we’re good to go.
Getting the Image
To get the image I wanted, I set the flashgun to camera left and slightly higher than the model. It was behind the model a little. I fired a few shots off to confirm the flashgun link was working and to get the proper exposure. It only took 4 or 5 shots to get this right.
Then I just moved the light further around the model to get the edge lighting that I wanted. That took another 5-10 shots. But there’s a difference between getting the look and getting the actual photograph. The look gave me the edge lighting etc., but I took another 20 or so photographs before I got the actual image that I wanted.
The lessons learned here
I’m a great believer in always learning something from everything you do – like not taking a fresh-baked cookie while your mum is nearby armed with a wooden spoon (I was 45 at the time!), or how to prevent lens flare when shooting towards the light. My lessons learned here are…
- When photographing edge lighting, angles are critical. Moving the flashgun slightly to one side or the other can change the edge lighting effect. It helps to set your camera on a tripod – then your angles remain fixed when you set them up properly.
- If you move the light too far around to the back of the model, the flash will directly hit your lens and create flare. This can be good or bad according to what shot you’re trying for.
- Even when the camera and lights are properly set up, the direction your model faces becomes critical. The slightest movement of her head can affect the photograph. It sometimes requires tact from the photographer and patience from the model to get this to work properly.
How to position the flashgun
If you want to know whether or not your flash is set in the right position, you first need to decide the camera position. You will set the camera facing the side of the model’s face – she will be looking directly left or right. Now sight a line from the model’s cheek and past the tip of her nose – this will give you an approximate line for checking the flash position. Fine-tune the light by having the model move her head left or right.